Her kommer så Bettys berømte opskrift. hvis man er nybegynder indenfor kager, så er denne super god, idet Betty har lavet en meget udførlig beskrivelse af arbejdsgangen og en dag for dag plan.
Bettys dag for dag plan samt andre af hendes tips og ideer står i bunden af indlægget
(opskriften er til en bryllupskage i 3 etager – svarer ca. til 60 personer)
DE BEDSTE LAGKAGEBUNDE (Hver portion er til 2 bunde)
Øverste kage:
2 æg, 50 g flormelis, 30 g hvedemel, 30 g majsstivelse, ½ tsk. bagepulver
Mellemste kage:
4 æg, 100 g flormelis, 65 g hvedemel, 65 g majsstivelse, 1 tsk. bagepulver
Nederste kage:
6 æg, 150 g flormelis, 100 g hvedemel, 100 g majsstivelse, 1½ tsk. bagepulver
Fremgangsmåde:
Det er bedst at lave en portion dej ad gangen. Så er det mere overskueligt. Skil æggene, så hviderne er for sig selv og blommerne er for sig selv. Pisk æggehviderne stive i en ren og tør skål. Pisk derefter i en anden skål æggeblommer med flormelis, til massen er lys og luftig - pisk ca. 5 minutter med en elpisker. Bland hvedemel, majsstivelse og bagepulver sammen, og pisk det hurtigt i æggemassen. Pisk evt. 3 spsk. æggehvide i dejen med elpisker, inden resten af hviderne vendes forsigtigt i massen, så dejen bliver luftig.
Tag et stort stykke bagepapir og smør det lidt med fedtstof. Bagepapiret kan ligge på en bageplade eller i en bradepande. Fordel halvdelen af dejen på bagepapiret (det er et meget tyndt lag, men det hæver i ovnen). Dejen skal bredes så meget ud på bagepapiret, at bunden vil kunne dække ”platformen” til bryllupskagestativet. Bag bunden i ca. 10 min. ved 225 grader i en forvarmet ovn. Hold øje med bunden og bliver den for mørk, kan der lægges staniol over. Lad bunden køle af, før bagepapiret fjernes. Fordel herefter den sidste halvdelen af dejen på et nyt stykke bagepapir, og følg ovennævnte vejledning.
CHOKOLADEKAGEBUND
Øverste kage:
2 æg, ½ dl sukker, 75 g smeltet, mørk chokolade, 0,75 dl mel, 0,25 dl majsstivelse, ½ tsk. bagepulver, 15 g smeltet smør, 0,25 dl vand
Mellemste kage:
4 æg, 1 dl sukker, 150 g smeltet, mørk chokolade, 1½ dl mel, ½ dl majsstivelse, 1 tsk. bagepulver, 25 g smeltet smør, ½ dl vand
Nederste kage:
6 æg, 1½ dl sukker, 225 g smeltet, mørk chokolade, 2,25 dl mel, 0,75 dl majsstivelse, 1½ tsk. bagepulver, 35 g smeltet smør, 0,75 dl vand
Fremgangsmåde:
Det er bedst at lave en portion dej ad gangen. Så er det mere overskueligt. Skil æggene, så hviderne er for sig selv og blommerne er for sig selv. Pisk æggehviderne stive i en ren og tør skål. Pisk derefter i en anden skål æggeblommer med sukker, til massen er lys og luftig - pisk ca. 5 minutter med en elpisker. Smelt chokoladen over et vandbad eller i microovnen, afkøl den lidt og pisk den i æggemassen. Sigt mel, majsstivelse og bagepulver og vend det i dejen sammen med vand og smør. Pisk evt. 3 spsk. æggehvide i dejen med elpisker, inden resten af hviderne vendes forsigtigt i massen, så dejen bliver luftig.
Tag et stort stykke bagepapir og smør det lidt med fedtstof. Bagepapiret kan ligge på en bageplade eller i en bradepande (det er et meget tyndt lag, men det hæver i ovnen). Dejen skal bredes så meget ud på bagepapiret, at bunden vil kunne dække ”platformen” til bryllupskagestativet. Bag bunden i ca. 35 - 40 min. ved 180 grader i en forvarmet ovn til kagen føles fast. Hold øje med bunden - den kan godt være færdig før tid alt efter hvilken ovn der bruges. Lad bunden køle af, før bagepapiret fjernes.
Føler man for det, kan man godt bruge mere end 150 g mørk chokolade. - Jeg bruger gerne 200 - 250 g, men det er jo en smagssag.....
OBS! Alle bundene kan laves i forvejen og fryses ned! Skal tøs’ op ved stuetemp.
Hindbærmousse
(der er rigeligt til alle 3 kager)
500 g dybfrosne hindbær, 2 spsk. Sukker, Kornene fra 1 hel vanilliestang,
4 dl youghurt naturel, ½ - 1 liter piskefløde
Fremgangsmåde:
Bærrene optøes og moses ud med sukker og vanille. Yoghurten vendes i hindbærrene og til sidst vendes det hele med den stivpiskede fløde.
Stil moussen koldt 1 times tid.
Tip! Hindbærrene kan erstattes med brombær, solbær el. lign. Evt. jordbær, men de er mere ”våde” end hindbær, så de skal ”drænes” godt for vand, og så skal der bruges mere pisket fløde.
OBS! Moussen kan fryses, og tøs’ op ved stuetemp. Piskes evt. med lidt mere flødeskum (en kvart eller en halv liter piskefløde – Det er en vurderingssag).
Tobleronecreme
600 – 800 g toblerone, ½ - 1 liter piskefløde
Fremgangsmåde:
Smelt Tobleronen over vandbad eller i micro-ovnen. Pisk piskefløden stiv. Når Tobleronen er kølet ned, vendes den forsigtigt med flødeskummet. Der kan bruges mere eller mindre piskefløde, alt efter hvordan man ønsker cremen.
Tip! Tobleronen kan evt. erstattes med hvid chokolade, mørk eller lys chokolade. Alt efter smag, kan der eksperimenteres med mintchokolade eller chokolade med ”knas”. Det smager også lækkert, at supplere tobleronen med 500 g nougat.
OBS! Moussen kan fryses, og tøs’ op ved stuetemp. Piskes evt. med lidt mere flødeskum (en kvart liter piskefløde, måske en anelse mere – Det er en vurderingssag).
Den nemme smørcreme
625 g sukker, 2½ dl vand, 1250 g usaltet, blødt smør, Evt. lidt smagsstof. Kog sukker og vand til en lage, og afkøl denne til stuetemperatur. Pisk smøret luftigt og tilsæt lagen lidt efter lidt. Tilsæt evt. smag (Citronsaft/skal, appelsin, essens eller lign.)
OBS! Smørcremen kan fryses, og tøs’ op ved stuetemp.
Masse til ”bomber”
1 dl pastauriserede æggehvide piskes stift og vendes med ca. 500 g flormelis. – Massen bliver ligesom alm. glasur, men den stivner på en anden måde når den tørrer. Når ”bomberne” skal laves, gøres det som følger: Lav et lille kræmmerhus ud af mellemlægningspapir (klister det godt til med klistrebånd, så det bliver nemmere at holde på). Sørg for at hullet hvor massen skal ud, er på størrelse med svovlet på en tændstik – Fyld herefter ca. 2 tsk. masse i kræmmerhuset, og luk det. Nu er kræmmerhuset lige til at presse små ”bomber” ud af. Øv dig evt. på et stykke papir først. Der skal laves adskillige kræmmerhus til en hel bryllupskage, for det kan ikke nytte noget, at prøve at genfylde et kræmmerhus der allerede er brugt. Det er noget værre ”nas” at arbejde med, så start hele tiden på et nyt kræmmerhus.
Andre ingredienser
Der skal desuden bruges:
Ca. 30 – 40 marcipanroser (alt efter hvordan kagen skal pyntes) – Hvis du laver roserne selv svarer det til ca. 500 g marcipan
Ca. 60 – 70 marcipanblade (igen alt efter hvordan kagen skal pyntes) – Hvis du laver bladene selv svarer det til ca. 200 g marcipan
Der skal bruges 3 store marcipanlåg min. 3 mm tykke. (størrelsen afhænger af ”platformene” til bryllupskagestativet)
Diverse pynt til kagen, f.eks. silkebånd, marcipanduer- eller hjerter og selvfølgelig en topfigur.
Så skal bryllupskagen lægges sammen!
Tidsplan (udgangspunktet er, at bryllupskagen skal være færdig til om lørdagen)
Lørdag, Søndag og Mandag: Lave marcipanroser og blade – Tip! Form bladene til roserne og til bladene i en lille plastikpose liggende på bordet. Så kan man få kanterne helt tynde uden at det går i stykker.
Tirsdag: Bag chokoladebundene og opbevar dem i lufttætte beholdere (hvis de har været frosset ned, skal de tøes op ved stuetemperatur)
Onsdag: Bag de hvide bunde og opbevar dem i lufttætte beholdere (hvis de har været frosset ned, skal de tøes op ved stuetemperatur)
Torsdag:
1. Lave hindbærmoussen og Tobleronecremen.
2. Udstik alle bundene, så de passer lige til ”platformene” til bryllupskagestativet.
3. Læg chokoladebunden i ”udstikker-ringen” på ”platformen”. Ovenpå chokoladebunden lægges et tykt lag hindbærmousse, og derefter lægges en alm. bund. Herpå lægges et lag Tobleronecreme og til sidst lægges den sidste bund på. Alle 3 kage overdækkes og stilles koldt, gerne i køleskabet (hvis de kan være der). Det er vigtigt at de står koldt, så moussen kan stivne.
Fredag: Fjern ”udstikker-ringene”. Alle 3 kager dækkes med et lag smørcreme, så farverne på kagen dækkes. Derefter dækkes hver kage med marcipan (se vejledningen til pålægning af marcipan).
Pynt kagen med marcipanroser, blade o.s.v. – HUSK NU, at lægge pynten ens på alle 3 kager. Hvis stativet kan fragtes samlet, så saml stativet med kagerne først, og pynt kagerne når stativet er samlet. Det er nemmest, at gøre kagerne ens på den måde.
Lav til sidst små ”bomber” hele vejen rundt om kage, der hvor marcipanen slutter, så kanten ikke kan ses. De må ikke være for store. Husk at lægge dem tæt, så ser det pænest ud.
NYD nu din kreation, og dæk hele bryllupskagen forsigtigt med madfilm, og stil kagen koldt, MEN IKKE I KØLESKABET! Hvis der ikke er andre mulighed for at opbevare kagen i køleskabet, skal kagen dækkes meget, meget godt til med plastik, så går det nok
Med hensyn til at købe marcipan, topfigurer m.v. kan det anbefales at tage kontakt til:
”Special Købmanden” i Cityarkaden i København
”Harderer Marcipan” – se mere på www.marcipan-figur.dk.
Udstikkerringe
Hvis du ikke har udstikkerringe, så kan du lave en hjemmelavet version med pap og sølvpapir/bagepapir. Dette gøres således:
Når kagerne skal lægges sammen, lægger du de nederste bunde på "platformene" på bryllupskagestativet, og så laver du 3 lange (de skal være så lange, at de kan nå hele vejen rundt om bundene, og de skal vel være ca. 17 cm brede) stykker pap, som du folder sølvpapir eller bagepapir om, så pappet ikke ligger direkte op imod kagen. Så sætter du chokoladebundene på hver deres "platforme", og så folder i pappet rundt om bundene, så pappet står op fra bunden som et "rør", og så klistre du enderne sammen med klisterbånde. Husk at bunden skal være helt "omsluttet" af pappet, men der må hellere være en lille "revne" mellem pap og bund end at pappet bøjer bunden. Så begynder du ellers at fylde hinbærmousse ned i rørene, derefter en bund o.s.v. Til sidste presser du let på den øverste bund, så kagen bliver så lige som muligt.
Sådan lægges marcipanen på bryllupskagerne:
Marcipanen rulles ud, så der er min. 10 cm for meget hele vejen rundt. Husk, at marcipanen ikke må være rullet for tyndt ud, så sprækker den, når du prøver at lægge den på.... Rul marcipanen ud på bagepapir! Tykkelsen skal helst være min. 3 mm.
Det er en god idé at være 2 personer om at lægge marcipanen på kagen: Tag marcipanen, som er rullet ud på bagepapir. En af jer holder fast i den ene side, og en i den anden side. Vend marcipanen rundt, så bagepapiret er øverst. Mål med øjet om kage er nogenlunde lige under marcipanen. Læg det derefter forsigtigt på, og mens den ene trækker forsigtigt i bagepapiret, holder den anden marcipanen nede på kagen.
Herefter klipper du det overskydende marcipan væk, men du skal dog have ca. 5 cm. i overskud, så du kan rette det til til sidst.
Start nu med at glatte marcipanen ned langs siden, tag et lille stykke ad gangen, og til sidst skærer du så marcipanen til med en lille skarp kniv, så den passer med højden på kagen.
Jo tykkere marcipanen er, jo nemmere er det at lægge på!
Husk: Kagen må ikke sættes ubeskyttet i køleskabet, for så begynder marcipanen at skinne. Det er bedst, hvis du bare kan opbevare kagen koldt, men ellers så går det nok J!
Prisoverslag: ca. 400 - 450 kr. for ingredienser til selve bryllupskagen (det er excl. marcipanovertræk, pynt og topfigur). Beløbet kan naturligvis variere alt efter om f.eks. Tobleronen købes på tilbud.
Fra dette link: http://www.bryllupsklar.dk/forum/12545/bettys-bryllupskage.html
maj 31, 2012
maj 29, 2012
Fondant lollies
swirly fondant lollies from http://thedecoratedcookie.com/2009/11/swirly-fondant-lollies/
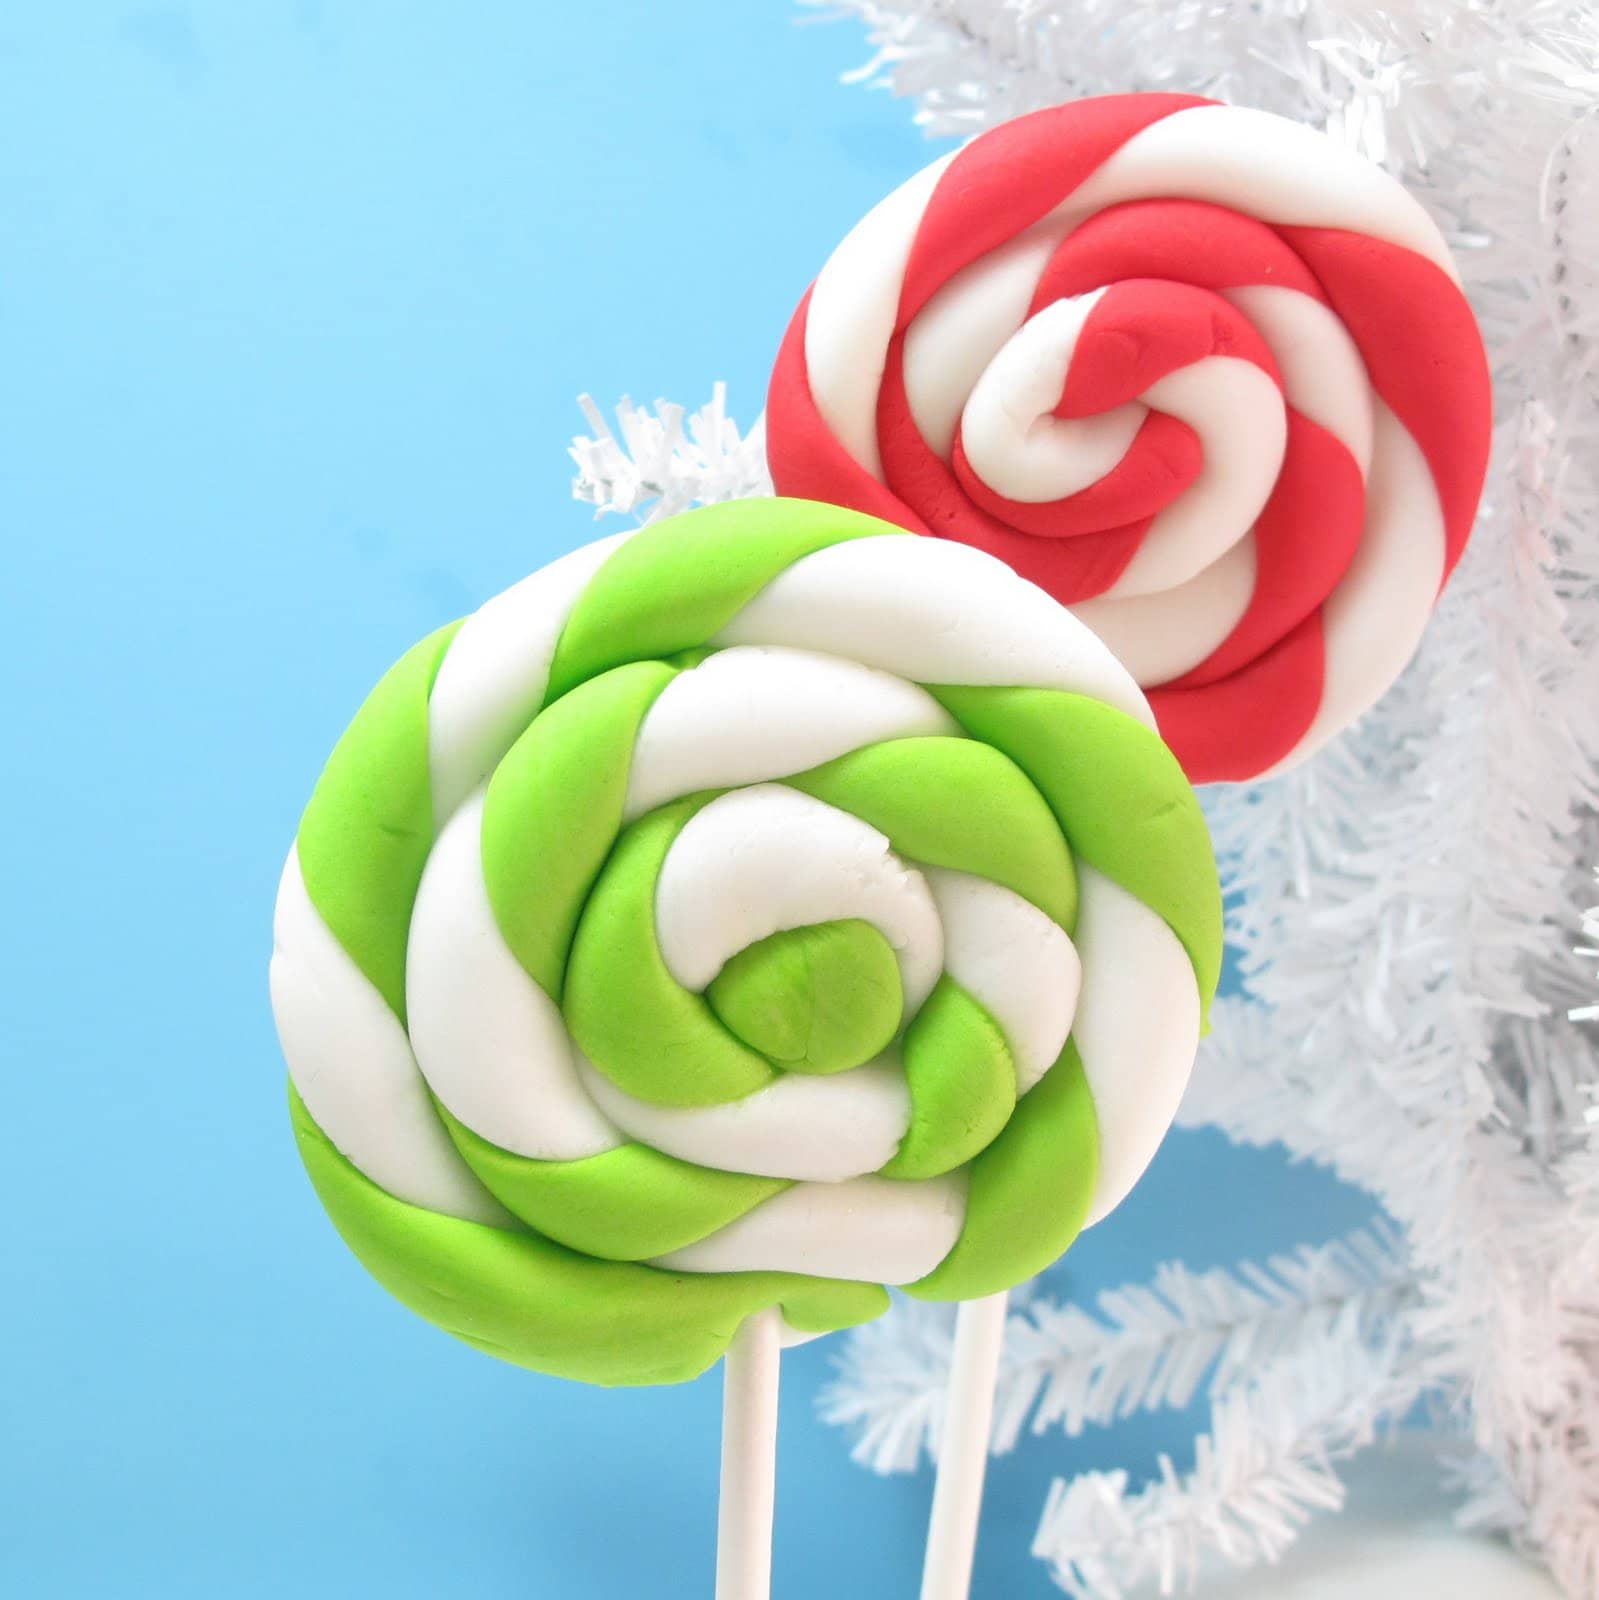 The lovely blogger over at Gordon Gossip found these cute, swirly goodies from Better Homes and Gardens and fretted over working with fondant. Fear not! Here’s a quick tutorial to ease nerves over fondant. Fondant is user-friendly and will open so many cake and cookie decorating doors.
As BHG advises, fondant is best used in small amounts. I use it for accents on cakes and cookies. In large amounts, it simply isn’t appetizing, so these lollies and the trees on their site work better as decor rather than treats. I made small lollies in lieu of trees simply because I only had half a box of fondant on hand.

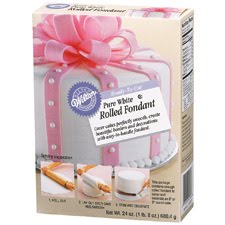
Prepared, white rolled fondant is available at major craft stores and cake decorating supply stores, usually the Wilton brand. It comes in big, white squares and is the consistency of Play-Doh. In fact, you manipulate it in much the same way.
TIPS:
- Fondant does dries out, but kneading it will soften it again.
- But kneading will also make it sticky and difficult. If fondant gets too soft (that is, if when working with fondant it starts to stick to your hands and leave residue, it’s too soft), let it sit uncovered on wax paper about 15 minutes and try again. It sho
 uld be pliable and simple to use. The first sign of frustration, stop and let it sit out to stiffen a bit.
 - Roll fondant easily between two pieces of wax paper.
- Tint fondant by adding a few drops of food coloring and kneading very well to blend it.
- Cut out shapes with cookie cutters or make 3-D shapes.
- To adhere fondant to other pieces of fondant or to cookies and cakes, you can either use light corn syrup or water dabbed on with a paint brush or your finger.
- Let stiffen about an hour and harden overnight.
- As mentioned, fondant can dry out, so wrap unused portions well in plastic.

you will need:
white rolled fondantfood coloring (I use Americolor soft gel pastes, Electric Green and Red)
lollipop sticks
step one: tint fondant
Knead a few drops of coloring into a palm-ful of fondant very well. Let sit out if it gets too sticky.
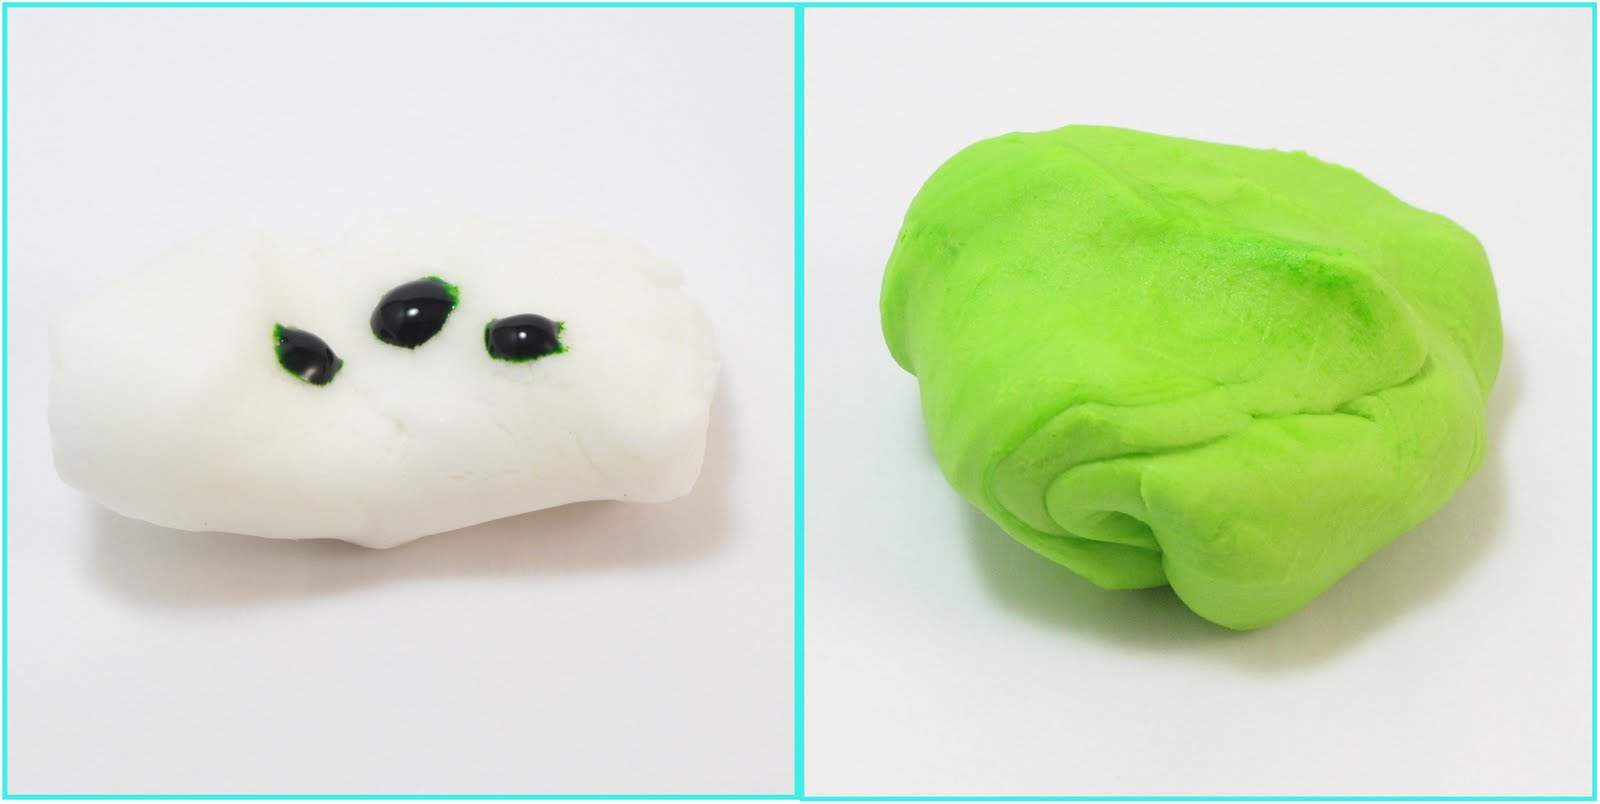
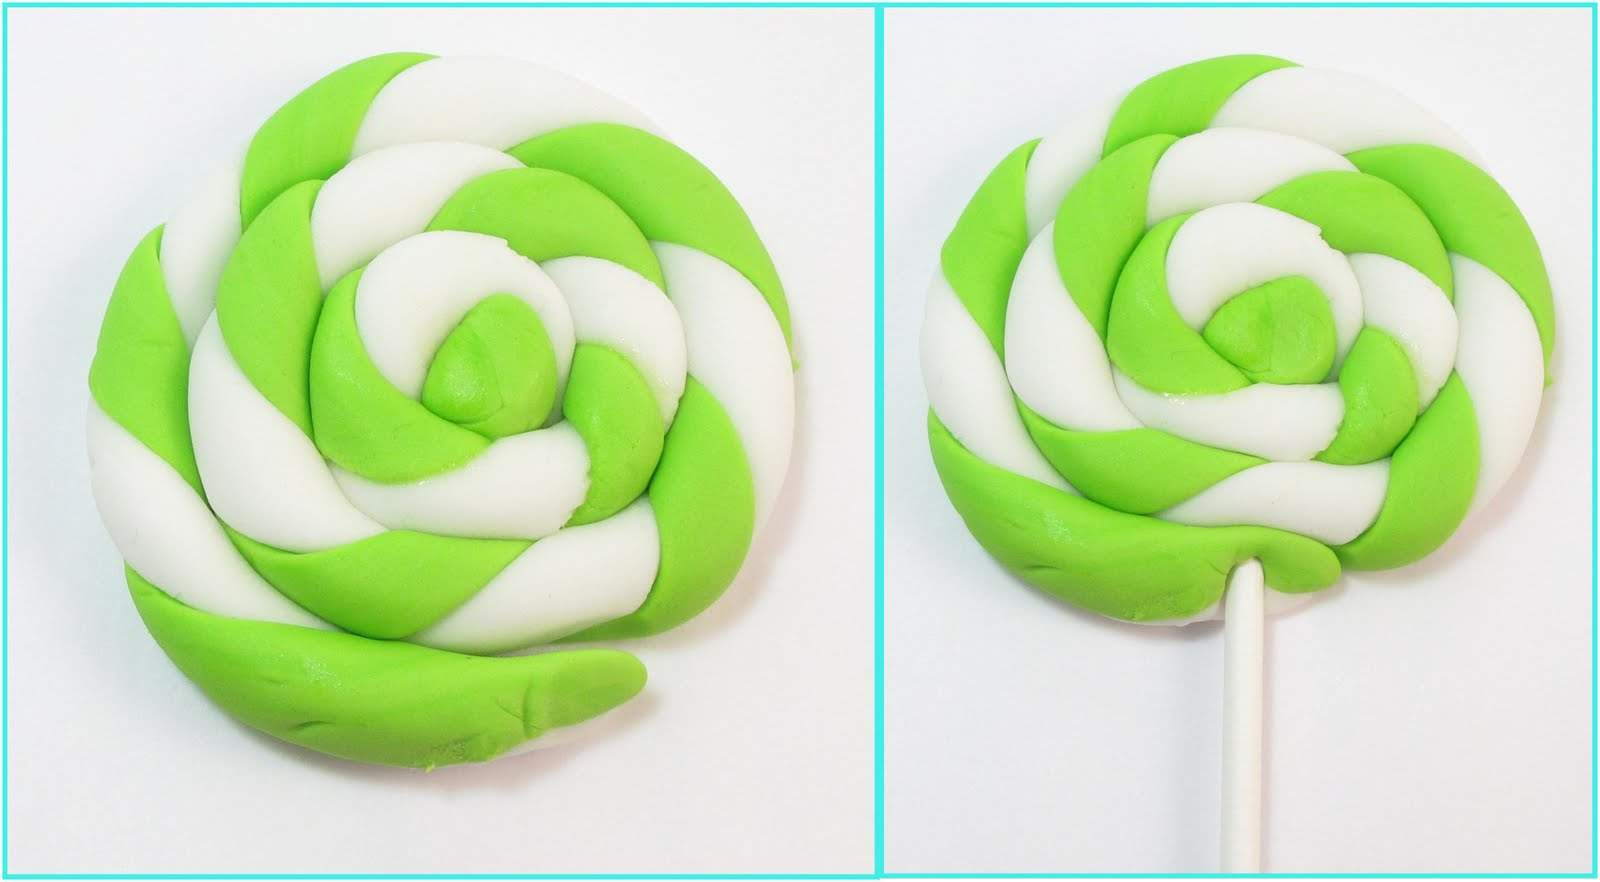
step two: roll fondant logs
I used smaller lengths than the bhg instructions. I took a small piece, about a 1 1/2 inch ball, of tinted fondant and rolled it into a log on the counter about 10″ long and 1/4″ thick. Repeat with white fondant and line up the two logs. Here, bhg uses three logs (two white and one tinted) to achieve a smaller colored stripe. I wanted a bigger stripe so only used one white and one tinted. Carefully smush the two logs together with your fingers. Holding the ends, twist the logs. Then, alternately continue smushing the logs together with your fingers and rolling the new, blended log with your palm on the counter. The logs should blend together like shown.
 step three: twirl your lolly
Now, simply coil the log into a circle and seal ends with a dab of water. If any part of the log is loose, use a touch of water as glue. Insert stick at bottom and let set an hour and harden overnight.
Gumball machine from Karaparty
taken by Lyndsey Fagerlund.

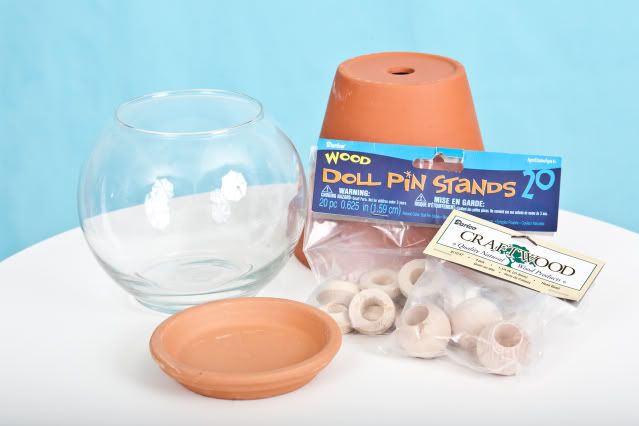
It really is quite simple…

You will need:
1 terra cotta pot {with saucer base}
1 wooden ball {found at craft store}
1 wooden doll pin stand {found at craft store}
1 tube of E600 glue OR hot glue {& glue gun}
1 round bubble bowl {you can find these at Walmart}
1 can of spray paint

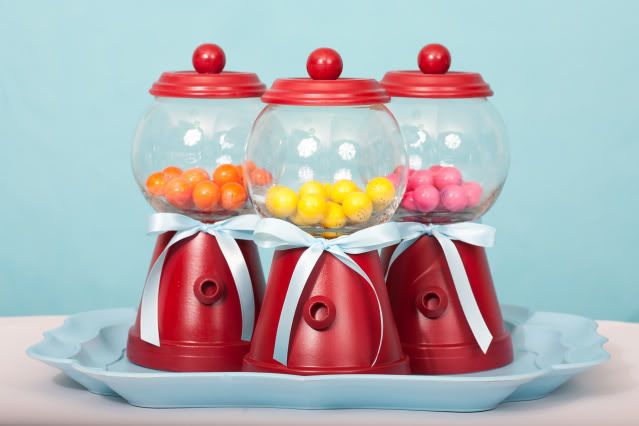
STEP ONE: Paint your terra cotta pot & base, your round wooden ball and your doll pin stand with the spray paint and let dry.
STEP TWO: Place terra cotta pot upside down and apply glue to the bottom. Then attach the round bubble bowl to resemble a gumball machine.
STEP THREE: Turn the terra cotta saucer base upside down and glue the round wooden head bead to the center top and let dry.
STEP FOUR: Attach the wooden doll pin stand to the front of the terra cotta pot to resemble an opening.
STEP FIVE: Place the terra cotta saucer on top of the bubble bowl {it will act as a lid, coming on and off} and…
YOU HAVE A GUMBALL MACHINE!
These would also make fun cookie jars!
Again, to see the rest of this Bubble Gum Party go here!

Sweet trees
How to make sweet topiary trees


I am often asked about Sweet topiary trees are they easy to make, I am happy to make them for you if you think that they are too time consuming or would be equally happy to supply th Oasis Balls so that you can make your own. The most popular types of topiary trees are probably the ferrero rocher trees and the strawberry trees, but you can make them out of any kind of sweets or even lollipops!
They are really easy to make you will need round oasis balls, or styofoam balls, wooden dowels or good quality natural twigs for support, and a pot for each tree, which you could decorate or paint or if you are good at decoupage you could put pictures of the bride and groom or names and the date.......(you get the idea!) you will also need a glue gun, some curling ribbon,some toothpicks, and a pretty organza bow to tie on the tree to decorate. You will also need a bag of plaster of Paris.
Firstly cover your ball with a couple of sheets of cellophane or a light crepe paper.Center the end of the wooden dowel at one end of the Styrofoam or Oasis ball. Push the dowel into the ball firmly. Do not push it all the way through, however push it far enough so that the weight of the sweets on the ball later will not cause it to fall off the dowel. You can also put some craft glue on the end of the dowel to ensure it stays in the Styrofoam ball.
Make up the bag of plaster of Paris according to instructions. Fill up your pots to 3/4 full and leave to set for a couple of minutes, center the other end of the dowel or stick into the plaster of paris and hold for a minute untill set, you now have your tree! Once the plaster of Paris is set you can cover it up with either some moss or some crushed cellophane or material or crepe paper.
Decorate by either sticking a toothpick into your sweet and then into your tree or by just using glue to hold them on if you are using a glue gun be carfeul as they get hot and you do not want to either burn yourself or melt the chocolates! Fill in any gaps with some curling ribbon or crushed crepe paper and tie on your pretty bow.
Yoou could also use strawberries which have to be attached with toothpicks but are really nice for a summer wedding, you could make variations on these by first of all dipping them in chocolate or white chocolate and or dipping them in sprinkles.
You could use toffees, fudges, roses, quality street, lollipops anything that you can get your hands on! There are so many Variations. Most of all have fun and dont eat all the goodies before they get to your tree! Also your tree does not have to be made of sweets (although that is my favourite kind!!!) you can use dried rose buds, try using small christmas tree ornaments at christmas, in different sizes and colours or pine cones, the possibilites are endless! The foam shapes also come in a tree shape so you can make little trees also. You could also have two or three balls on larger dowels but would need to secure these with a dollop of glue. And of course you can always add a bit of ivy along the stem if wished!
http://macsflowers.blogspot.com/2009/11/how-to-make-sweet-topiary-trees.html
maj 28, 2012
opskrifter
http://www.sheknows.com/food-and-recipes/menus-recipes/articles/page:8
Lidt søde sager opskrifter:
Note: You can also freeze dough. After mixing, put dough in a gallon size Freezer ziploc bag (or wrap well) and freeze. Thaw overnight or for at least a few hours in the refrigerator in the ziploc bag. If too chilled to handle, let sit at room temperature for about 1/2 hour to 1 hour until it’s workable. Chilled is good, though, don’t let it get too mushy.
Chocolate Rolled Cookies
(use this for cookie cutter cookies)
Cookies-on-a-Stick:To make cookie pops, roll out chilled sugar cookie dough about 1/4-inch to 3/8-inch thick. Cut out your shape, insert a lollipop stick into the cookie at the base, centered in the cookie’s thickness. Press the stick about half way into the cookie. No stick should poke through the front or back of the cookie. Pat the cookie’s shape back in place with your fingers, if necessary. Place the cookies on a parchment paper-lined baking tray, and bake according to the recipe. Cookies may need a couple extra minutes of baking time, since they are thicker. Make sure the sticks don’t touch each other or other cookies when placed on the baking tray.
Buttercream Frosting
(Use this for cakes and cupcakes, or for sandwich cookies.)
1/2 cup (1 stick) plus 2 tablespoons unsalted butter, softened
VeganFor a vegan version of cut-out cookies and cookie decorating icing, click HERE. Really, they were good. Really good. And I tried a lot of vegan cut-out cookies that were not good.
Metric ConversionsBelow find some metric conversions after a reader wisely requested them. But some disclaimers: I made these conversions based on internet research (with the understanding that recipe conversions are not straightforward mathematics, and different ingredients translate differently). I don’t cook with these measures, so they’ve not been tested. I have no concept of metric amounts. I need to see them to understand them and know how they relate to US amounts. Preferably if a reader were to invite me to their English countryside castle home to help them bake? I studied a wee bit at Oxford, and I do adore the area. A London suite would work as well.
some conversions for folks elsewhere! (again, not tested, based on internet research):
2 sticks butter = 1 cup = 8 ounces = 227 g
1 cup confectioners (or icing/powdered) sugar = 128 g
1 teaspoon extract = 4.2 g = 5 mL
2 1/2 cups all purpose flour = 312 g
1 teaspoon salt = 4.2 g
4 tablespoon meringue powder = 56 g
1/2 cup water = 4 ounces = 60 mL = 113 g
6 cup confectioners sugar = 768 g
1/4 cup vegetable shortening = 56 g
1 cup granulated sugar = 200 g
2 cup flour = 240 g
1/2 cup cocoa powder = 62.5 g
1/2 teaspoon baking soda = 2.1 g
1/2 teaspoon salt = 2.1 g
375 degree F = 190 degree C
Lidt søde sager opskrifter:
cookie dough and frosting recipes
cookie, icing and frosting recipes
My top secret recipes that everyone else had to pay for when they bought my book:
Sugar Cookies:
(use this for cookie cutter cookies)
2 sticks unsalted butter, softened
1 cup confectioner’s sugar
1 egg
1 tsp vanilla extract
(can add 1 1/2 tsp almond extract here. Yummy. I do that.)
2 1/2 cups flour
1/2 tsp salt
Cream butter and sugar. Add egg and blend well. Add extracts and blend. Mix flour and salt and gradually add. Cover dough with plastic wrap (I usually put mine in a gallon size Ziploc bag) and chill dough for about 2 hours. Don’t skip this. You must chill the dough. Working with about 1/3 of the batch at a time, briefly knead the chilled dough and roll about 1/8 inch to 1/4 inch thick. Cookies on a stick may need to be rolled out 3/8 inch thick. Cut out shapes. Insert a lollipop stick about half way into the cookie, if using. Bake cookies on parchment paper-lined baking trays at 375 for 12-14 minutes. Thicker cookies may need up to 20 minutes. Just watch for edges that are nicely golden. Note: You can also freeze dough. After mixing, put dough in a gallon size Freezer ziploc bag (or wrap well) and freeze. Thaw overnight or for at least a few hours in the refrigerator in the ziploc bag. If too chilled to handle, let sit at room temperature for about 1/2 hour to 1 hour until it’s workable. Chilled is good, though, don’t let it get too mushy.
Chocolate Rolled Cookies
(use this for cookie cutter cookies)
1 cup (2 sticks) slightly softened, unsalted butter
1 cup granulated sugar
1 egg
1 tsp. vanilla extract
2 cups flour
1/2 cup unsweetened cocoa powder
1/2 tsp. baking soda
1/2 tsp. salt
Cream butter and sugar. Add the egg and vanilla and blend. Mix together the dry ingredients and gradually add to the wet. Cover and refrigerate 1 to 2 hours. When chilled, roll out on a floured surface, cut out shapes, and bake on a parchment paper-lined baking tray in a preheated 375 degree oven. Bake 8 to 10 minutes for small cookies, 10 to 12 minutes for larger cookies, or until edges are crisp. Thick cookies may need a few extra minutes. TIP: In lieu of flour, which may show up on the surface, you can roll cookies between two pieces of wax paper.Cookies-on-a-Stick:To make cookie pops, roll out chilled sugar cookie dough about 1/4-inch to 3/8-inch thick. Cut out your shape, insert a lollipop stick into the cookie at the base, centered in the cookie’s thickness. Press the stick about half way into the cookie. No stick should poke through the front or back of the cookie. Pat the cookie’s shape back in place with your fingers, if necessary. Place the cookies on a parchment paper-lined baking tray, and bake according to the recipe. Cookies may need a couple extra minutes of baking time, since they are thicker. Make sure the sticks don’t touch each other or other cookies when placed on the baking tray.
Royal Icing (sort of):
(use this for cookie decorating)
Note:This frosting is similar to traditional royal icing, but I add shortening and flavoring to make it taste delicious. Thus, it dries hard enough to handle and pack when left overnight, but not rock hard, like traditional royal icing. The consistency is NOT the runny kind used for flooding. It’s stiffer. Take a spoonful, turn it over the bowl. The frosting should cling to the spoon and slowly fall into the bowl. That’s the right consistency. You may thin this icing with water to make it the right consistency for flooding. Use royal icing (sort of) for cookie decorating.
4 tblsp meringue powder (available at many supermarkets and in most craft stores)
1/2 cup water
7-8 cups confectioner’s sugar (may need more or less, see the consistency advice above)
1 tsp vanilla extract
2 Tblsp Crisco
2 Tblsp light corn syrup
Whip the meringue powder and water on high speed for a looooong time, several minutes, until it’s fluffy and peaks form (use an electric hand beater or the wire whisk of your standing mixer). Gradually add the rest of the ingredients to desired consistency. Store at room temperature in a sealed container for up to a month.Buttercream Frosting
(Use this for cakes and cupcakes, or for sandwich cookies.)
1/2 cup (1 stick) plus 2 tablespoons unsalted butter, softened
4 1/2 cups confectioner’s sugar
3 to 6 tablespoons milk
1 teaspoon vanilla extract
pinch of salt
Cream the butter with a mixer. Add 3 cups confectioner’s sugar, 1 cup at a time, blending well with each addition (mixture may be dry and crumbly). Add 3 tablespoons milk and vanilla and blend. Blend in remaining confectioner’s sugar. Add more milk (about 3 tablespoons) until desired consistency is reached. Add more milk to thin and more sugar to thicken.VeganFor a vegan version of cut-out cookies and cookie decorating icing, click HERE. Really, they were good. Really good. And I tried a lot of vegan cut-out cookies that were not good.
Metric ConversionsBelow find some metric conversions after a reader wisely requested them. But some disclaimers: I made these conversions based on internet research (with the understanding that recipe conversions are not straightforward mathematics, and different ingredients translate differently). I don’t cook with these measures, so they’ve not been tested. I have no concept of metric amounts. I need to see them to understand them and know how they relate to US amounts. Preferably if a reader were to invite me to their English countryside castle home to help them bake? I studied a wee bit at Oxford, and I do adore the area. A London suite would work as well.
some conversions for folks elsewhere! (again, not tested, based on internet research):
2 sticks butter = 1 cup = 8 ounces = 227 g
1 cup confectioners (or icing/powdered) sugar = 128 g
1 teaspoon extract = 4.2 g = 5 mL
2 1/2 cups all purpose flour = 312 g
1 teaspoon salt = 4.2 g
4 tablespoon meringue powder = 56 g
1/2 cup water = 4 ounces = 60 mL = 113 g
6 cup confectioners sugar = 768 g
1/4 cup vegetable shortening = 56 g
1 cup granulated sugar = 200 g
2 cup flour = 240 g
1/2 cup cocoa powder = 62.5 g
1/2 teaspoon baking soda = 2.1 g
1/2 teaspoon salt = 2.1 g
375 degree F = 190 degree C


Favors
When you're planning a party on a budget, there are so many things you really wish you could have, but have to cut due to the price.
Cute, delicious ways to thank your guests!
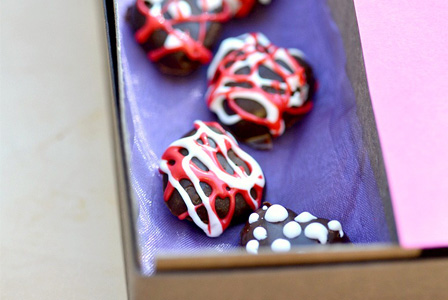
When I was planning my wedding last year, the big thing that had to be cut was adorable edible favors to leave with my guests. If you are budget planning and can't live without tasty treats to give your guests, try one of these easy, DIY edible favor recipes. Not only are they cute, but they are extremely budget-friendly.Mini milk chocolate boxes
These adorable, milk chocolate hearts are the perfect favor for a wedding or party around Valentine's Day or early spring. All you need to package these are cute little boxes, some fun colored tissue paper and cute ribbon to spruce it up. To make these more gourmet, drizzle each one with colored chocolate or royal icing.Yields 10 pieces
Ingredients:
- 2 cups milk chocolate chips
- 2 tablespoons butter
- Decorative icing
For the directions and a cute way to package these deliciously sweet candies, check out this article here on SheKnows!
Spicy trail mix containers
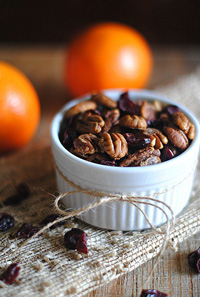
These spicy, citrus nuts are the perfect favors for summer parties because of the seasonal ingredients. Made from a mixture of nuts, orange peel and chipotle seasoning, they are the perfect mix of salty, spicy and sweet. If you don't have 100+ ramekins to package them in, simply pour a handful of the nuts in cellophane plastic wrap, tie with baker's twine and add a fun, festive tag!
One batch yields 10 (1/4 cup) servings.
Recipe & photo from Eat Yourself Skinny.
Ingredients:
- 1 tablespoon orange rind
- 1 tablespoon orange juice
- 1 large egg white
- 2 cups mixed nuts
- 1 tablespoon brown sugar
- 1/2 teaspoon chipotle seasoning
- 1/2 cup dried fruit
Directions:
- Preheat oven to 225 degrees F. Whisk together orange zest, orange juice and large egg white in a bowl. Stir in pecans, coating well. Add in sugar and chipotle seasoning, mix well. Spread mixture in a single layer in a baking dish coated with cooking spray.
- Bake for one hour, stirring occasionally. Remove from oven and cool completely. Stir in dried fruit.
Hot chocolate Mason jars
This is a perfect favor for chilly winter parties, like Christmas get-togethers and New Year's Eve. To save even more money on the jar packaging, ask your friends and family to save all of their jars (jam jars, pickle jars, you name it) so you don't have to spend an arm and a leg on fancy Mason jars! Plus, that way, each jar is different! Depending on your jar size, you can give each family or couple just one jar, which will save in cost!Ingredients:
- Hot chocolate packets
- Marshmallows
Directions:
- Depending on the size of your jar, pour two to four packets of hot chocolate into the jar. Cover the top with marshmallows. Cut a piece of fabric so it covers the top of the jar (with overhang) and place the top of the jar over the fabric. Tie baker's twine around the body of your jar and add a cute tag with instructions.
http://www.sheknows.com/food-and-recipes/articles/957593/diy-edible-wedding-favors


Yes Yes Ýes again
I love edible wedding and party favors, and Kelly Maron – mastermind behind Paper Stories and the hip Chicago bridal show Indie Wed – has stopped by EAD today to share her quick and easy how-to for S’mores on a Stick! And even better, she has created three adorable printable tags for these goodies in two color palettes. Print either the “Love on a Stick” or “Yum! Yum! Yum!” tags on sheets of label paper, and wrap around the S’more stick, or print the “Gimme S’more!” tag on cardstock, punch a hole, and attach to your S’more with decorative twine. Voila – easy peasy S’mores favors! Thanks Kelly for sharing!

You will need:

1) Insert the lollipop sticks into the marshmallows and set aside.

2) Melt the chocolate according to the package instructions. It is best to melt a little at a time in a smaller dish.
3) Dip and roll the marshmallow into the chocolate, covering the sides and top, then immediately roll side of marshmallow through the graham cracker crumbs.

4) Secure the stick into something that will keep it upright while the chocolate dries. I used a cardboard box with holes poked in it. A large block of styrofoam (the ones that come as packaging in boxes) work well too.

5) Continue steps 3 & 4 with the rest of the marshmallows. Melt more chocolate as needed.
6) When the chocolate has set, wrap the treat in a clear bag, wrap with twine and add desired printable tag. Voila! S’mores on a stick.

{Photos and tutorial by Kelly Maron of Paper Stories}
http://www.elizabethannedesigns.com/blog/2011/04/15/smores-favors-printable-gift-tags/
You will need:
- Melting chocolate (milk-chocolate candy melts available at Michaels, Hobby Lobby etc)
- Large marshmallows
- Graham crackers, crumbled into a small dish
- Lollipop sticks (I prefer the long ones) – available at Michaels, Hobby Lobby or online
- Clear treat bags & twine for packaging
1) Insert the lollipop sticks into the marshmallows and set aside.
2) Melt the chocolate according to the package instructions. It is best to melt a little at a time in a smaller dish.
3) Dip and roll the marshmallow into the chocolate, covering the sides and top, then immediately roll side of marshmallow through the graham cracker crumbs.
4) Secure the stick into something that will keep it upright while the chocolate dries. I used a cardboard box with holes poked in it. A large block of styrofoam (the ones that come as packaging in boxes) work well too.
5) Continue steps 3 & 4 with the rest of the marshmallows. Melt more chocolate as needed.
6) When the chocolate has set, wrap the treat in a clear bag, wrap with twine and add desired printable tag. Voila! S’mores on a stick.
{Photos and tutorial by Kelly Maron of Paper Stories}
http://www.elizabethannedesigns.com/blog/2011/04/15/smores-favors-printable-gift-tags/

Christmas idea
Layered Ribbon Trees
In case you didn’t see my guest post over at Under the Table and Dreaming for the Handmade Holidays featuring STYROFOAM™ Brand Foam series, here is my project…
When I started making the trees I tried to keep three things in mind:
1) I wanted a little winter forest
2) It needed to match my more contemporary/modern decor
3) I wanted to use varying shades of silver and white, with lots of sparkle

Supplies:
 Take the ribbon and fold it across itself, then fold it down to form a point. Cut it off the spool.
 Take your ribbon point and pin it to the very bottom of the Styrofoam™ Brand cone, so that the ribbon hangs over the edge. Repeat the process all the way around the cone. For the next row, pin the ribbon so that the point overlaps the edges of the two ribbons below it. Repeat this process until you reach the top. Once at the top, cut the ribbon strips longer. Fold the sides of the ribbon in, so that the wire edges don’t show. Pin the point down on the tree, and take the longer end and roll it in and pin it to the top, being careful to hide the pins in the ribbon.
 I try to make the top of the tree look pointed, but that is just a personal preference.
I used fabric on the dark gray trees, and to give them a sparkly, icy look, I sprayed the finished tree with adhesive spray and applied liberal amounts of glitter.

http://sparklepantsgirl.com/2011/11/layered-ribbon-trees/
When I started making the trees I tried to keep three things in mind:
1) I wanted a little winter forest
2) It needed to match my more contemporary/modern decor
3) I wanted to use varying shades of silver and white, with lots of sparkle

Supplies:
- two 18×5 Styrofoam™ Brand Cones
- two 15×5 Styrofoam™ Brand Cones
- two 12×5 Styrofoam™ Brand Cones
- wired ribbon** or fabric
- straight pins
- scissors
- adhesive spray and glitter (optional)
Take the ribbon and fold it across itself, then fold it down to form a point. Cut it off the spool. Take your ribbon point and pin it to the very bottom of the Styrofoam™ Brand cone, so that the ribbon hangs over the edge. Repeat the process all the way around the cone. For the next row, pin the ribbon so that the point overlaps the edges of the two ribbons below it. Repeat this process until you reach the top. Once at the top, cut the ribbon strips longer. Fold the sides of the ribbon in, so that the wire edges don’t show. Pin the point down on the tree, and take the longer end and roll it in and pin it to the top, being careful to hide the pins in the ribbon.
 I try to make the top of the tree look pointed, but that is just a personal preference.
I used fabric on the dark gray trees, and to give them a sparkly, icy look, I sprayed the finished tree with adhesive spray and applied liberal amounts of glitter.

http://sparklepantsgirl.com/2011/11/layered-ribbon-trees/


Abonner på:
Opslag (Atom)