Viser opslag med etiketten Insperation. Vis alle opslag
Viser opslag med etiketten Insperation. Vis alle opslag
juli 02, 2012
maj 14, 2012
Summer tables

Classic and Elegant.
Loving the green from the florals in contrast with the dark brown table and the mixture of the silver, crystal and gold table settings.
maj 12, 2012
YES !! mit næste projekt DYI looking great.
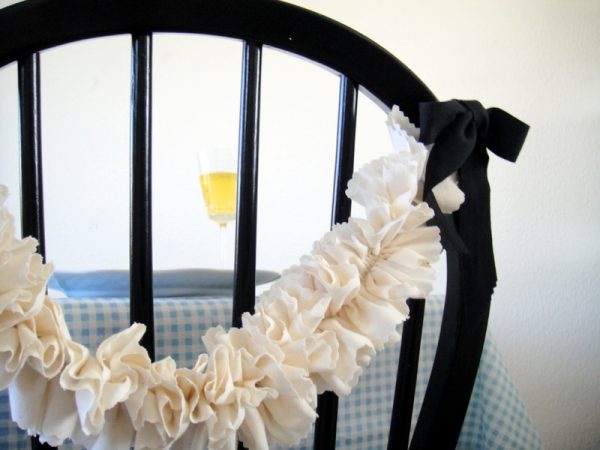
Hi sweets! It’s Jenny from Hank + Hunt and I am really excited about this DIY today…I’ve been meaning to share it with you. As you may know, the first thing I started selling in my shop were ruffled fabric garlands. I like them because they are pretty and girly and sometimes as a mom of two boys, you really need something feminine. But what I love most is that I can touch them and they will be around as long as my memories will. Garlands made out of fabric will last through years of celebrations.
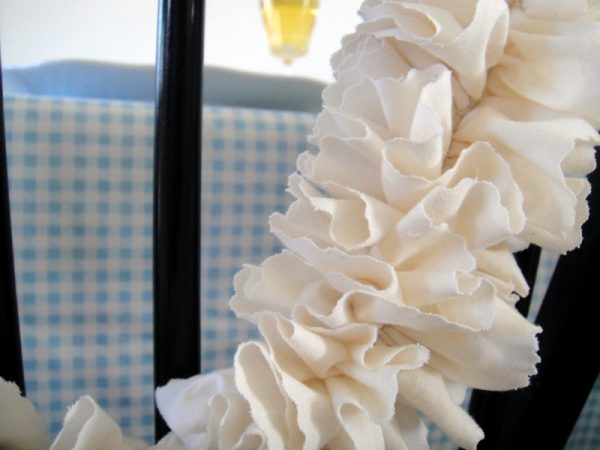
Make these for your wedding, use them for your mini munchkin’s first birthday, Sweet 16 and your 25th Anniversary. Make them in whatever length you want; today, I’m doing short chair garlands. Enjoy!
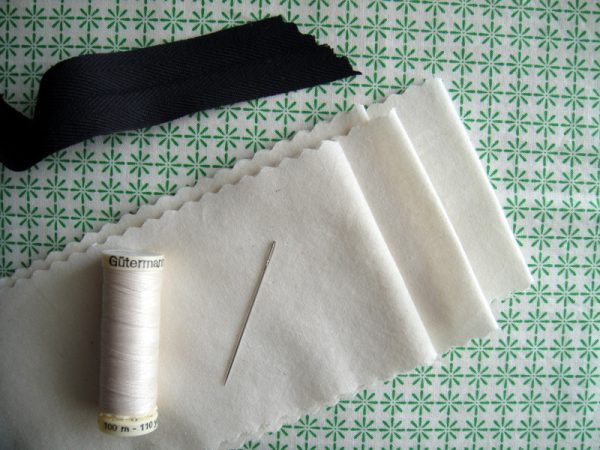
Supplies:
4 yards of fabric
Rotary cutter
Pinking shears
Thread and needle
Sewing machine
Twill tape or ribbon
Wash, dry and iron the fabric. Lightweight cotton (like muslin or cotton gauze) works best. Fold in half with the cut ends together, then fold in half three or four more times the same way. This shortens the length so the width can fit on the table cutting mat. Using a ruler, cut 3” strips perpendicular to the cut edge. This makes 3” by 4 yard long strips. Four yards of fabric will make at least 12 strips, depending on the width of the fabric. Now, take two strips and layer them on top of each other, right sides facing out.
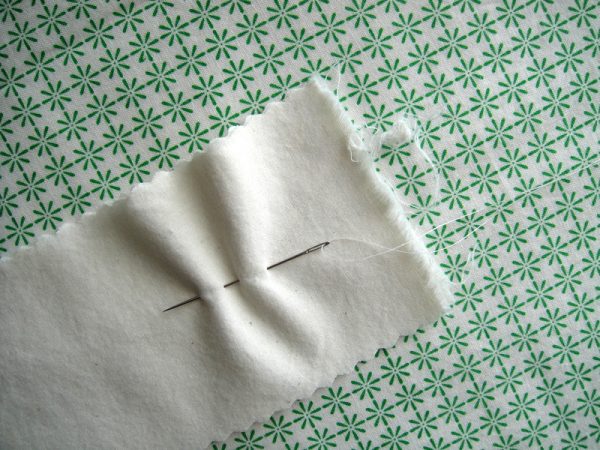
Thread the needle with a 2 yard length of thread, doubling over so you have a total length of 36”. Knot the end of the thread so it won’t pull through the fabric. Starting about 2-3” from the end of the strip, start sewing a straight gathering stitch down the center of both strips. Continue until you reach the end of your thread. Gently gather, keeping ruffles evenly spaced and flat. Continue sewing the gathering stitch to the end of your thread again.

Gently gather, and repeat. For the chair garland, I gathered four times total. For a longer garland, you would continue sewing and gathering until you reach the desired length. See #10 for how to join more strips of fabric continuously.

Once you have the length of garland you need, tie off the thread in a knot to hold the gather. Trim the end of the strip, with pinking shears, about 2-3” from the end knot. Trim the beginning end of the strip, if you haven’t already.
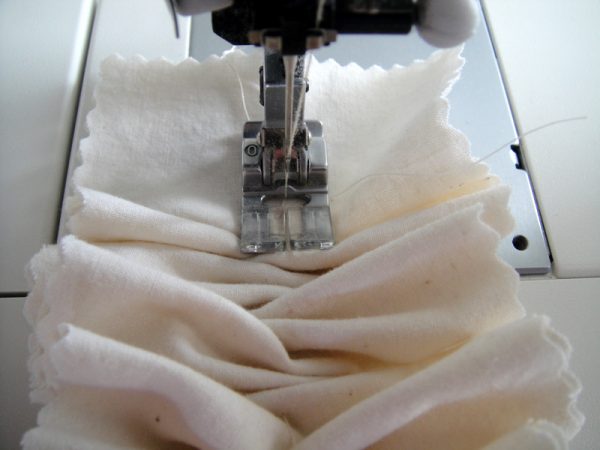
Now, for the sewing machine part. Using the zigzag stitch setting on the machine, shorten your stitch length setting so you have a thick embroidery style stitch. Starting 2-3” in from the end, stitch a straight line down the center of the gathered strips. This strengthens your gather, stitching it in place so it won’t break or move along the gathering stitch line.
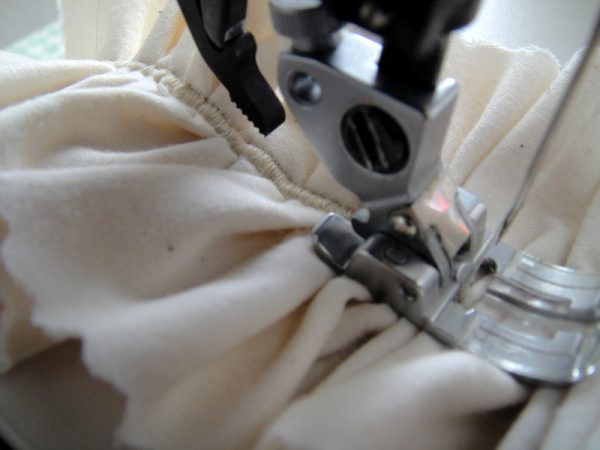
Be careful that the ends of your fabric don’t get caught under the needle; this is why we keep the ruffle flat with the edges to the side. **This step is REALLY important and without it, your garland gather can break. My first few garlands, used a plain straight stitch for securing, and their durability was very delicate. The embroidery stitch not only looks prettier, but is strong enough to endure more than one party.**
Continue sewing until you reach the end knot. Stop and trim your threads.

Cut two pieces of twill tape about a yard each. Fold in half and insert the folded end into the end of the strip, between the two layers.

Sew the embroidery stitch about ¼” from the end to the existing embroidery stitch. Stop, take out and trim threads.

Stitch the embroidery stitch across the end of the strips perpendicular to the length of the garland, as shown. Repeat on the other side to attach the other tie.
GET READY…

Let me introduce you to my little friend…THE RUFFLER. Ok, it really is Hank + Hunt’s best friend. This is a big trade secret for Hank + Hunt, without it I wouldn’t have sewn more than two or three garlands and with it I have sewn bolts of them. If you are planning to make garlands for your party or wedding, I’m telling you now… you need to get one for your machine. It’s called a ruffling foot and they make it for most sewing machines. For those of you that don’t sew much, you might not even know this…your machine can use different feet. All those fancy little rolled edges, attaching zippers easily, free form designs and YES, RUFFLES…it’s all in the foot. There is a lot of skill involved with sewing, but I promise you that if you can sew a straight line, you, too, can use THE RUFFLER. I know it sounds dramatic, but it really is called that for my machine. I have the box to prove it.

Let’s make a garland with The Ruffler. Take your two strips and insert them together through The Ruffler, pull through gently so you have about an inch or two at the end.

Make sure you are centered in the strip, and sew just like it was a straight line. Go ahead, smile because it’s so easy.

This little baby will evenly stitch even little gathers all day long. Stop when you have the length you need. Switch out to your regular foot and continue with steps 4 & 5. **Make sure you are sending the garland through the machine in the same direction, or it could pull the gather out.

ADDING MORE LENGTH: If you want to increase the length of your garland and have reached the end of your strip:
About 2” to the very end (make sure your ends are trimmed), insert the next two strips, right in between them in the center and continue sewing.
*This also works for hand gathering. Insert strips and continue sewing.

Directions for using garland:
1. FLUFF – Gently pull layers of fabric apart on each side.
2. HANG.
3. ENJOY!
Here you have a lovely little garland, and the lovely little secret recipe to make one. Enjoy! xo
Make these for your wedding, use them for your mini munchkin’s first birthday, Sweet 16 and your 25th Anniversary. Make them in whatever length you want; today, I’m doing short chair garlands. Enjoy!
Supplies:
4 yards of fabric
Rotary cutter
Pinking shears
Thread and needle
Sewing machine
Twill tape or ribbon
Wash, dry and iron the fabric. Lightweight cotton (like muslin or cotton gauze) works best. Fold in half with the cut ends together, then fold in half three or four more times the same way. This shortens the length so the width can fit on the table cutting mat. Using a ruler, cut 3” strips perpendicular to the cut edge. This makes 3” by 4 yard long strips. Four yards of fabric will make at least 12 strips, depending on the width of the fabric. Now, take two strips and layer them on top of each other, right sides facing out.
Thread the needle with a 2 yard length of thread, doubling over so you have a total length of 36”. Knot the end of the thread so it won’t pull through the fabric. Starting about 2-3” from the end of the strip, start sewing a straight gathering stitch down the center of both strips. Continue until you reach the end of your thread. Gently gather, keeping ruffles evenly spaced and flat. Continue sewing the gathering stitch to the end of your thread again.
Gently gather, and repeat. For the chair garland, I gathered four times total. For a longer garland, you would continue sewing and gathering until you reach the desired length. See #10 for how to join more strips of fabric continuously.
Once you have the length of garland you need, tie off the thread in a knot to hold the gather. Trim the end of the strip, with pinking shears, about 2-3” from the end knot. Trim the beginning end of the strip, if you haven’t already.
Now, for the sewing machine part. Using the zigzag stitch setting on the machine, shorten your stitch length setting so you have a thick embroidery style stitch. Starting 2-3” in from the end, stitch a straight line down the center of the gathered strips. This strengthens your gather, stitching it in place so it won’t break or move along the gathering stitch line.
Be careful that the ends of your fabric don’t get caught under the needle; this is why we keep the ruffle flat with the edges to the side. **This step is REALLY important and without it, your garland gather can break. My first few garlands, used a plain straight stitch for securing, and their durability was very delicate. The embroidery stitch not only looks prettier, but is strong enough to endure more than one party.**
Continue sewing until you reach the end knot. Stop and trim your threads.
Cut two pieces of twill tape about a yard each. Fold in half and insert the folded end into the end of the strip, between the two layers.
Sew the embroidery stitch about ¼” from the end to the existing embroidery stitch. Stop, take out and trim threads.
Stitch the embroidery stitch across the end of the strips perpendicular to the length of the garland, as shown. Repeat on the other side to attach the other tie.
GET READY…
Let me introduce you to my little friend…THE RUFFLER. Ok, it really is Hank + Hunt’s best friend. This is a big trade secret for Hank + Hunt, without it I wouldn’t have sewn more than two or three garlands and with it I have sewn bolts of them. If you are planning to make garlands for your party or wedding, I’m telling you now… you need to get one for your machine. It’s called a ruffling foot and they make it for most sewing machines. For those of you that don’t sew much, you might not even know this…your machine can use different feet. All those fancy little rolled edges, attaching zippers easily, free form designs and YES, RUFFLES…it’s all in the foot. There is a lot of skill involved with sewing, but I promise you that if you can sew a straight line, you, too, can use THE RUFFLER. I know it sounds dramatic, but it really is called that for my machine. I have the box to prove it.
Let’s make a garland with The Ruffler. Take your two strips and insert them together through The Ruffler, pull through gently so you have about an inch or two at the end.
Make sure you are centered in the strip, and sew just like it was a straight line. Go ahead, smile because it’s so easy.
This little baby will evenly stitch even little gathers all day long. Stop when you have the length you need. Switch out to your regular foot and continue with steps 4 & 5. **Make sure you are sending the garland through the machine in the same direction, or it could pull the gather out.
ADDING MORE LENGTH: If you want to increase the length of your garland and have reached the end of your strip:
About 2” to the very end (make sure your ends are trimmed), insert the next two strips, right in between them in the center and continue sewing.
*This also works for hand gathering. Insert strips and continue sewing.
Directions for using garland:
1. FLUFF – Gently pull layers of fabric apart on each side.
2. HANG.
3. ENJOY!
Here you have a lovely little garland, and the lovely little secret recipe to make one. Enjoy! xo


maj 08, 2012
Peonies - I forgot the link...let me know whom made the tutorial
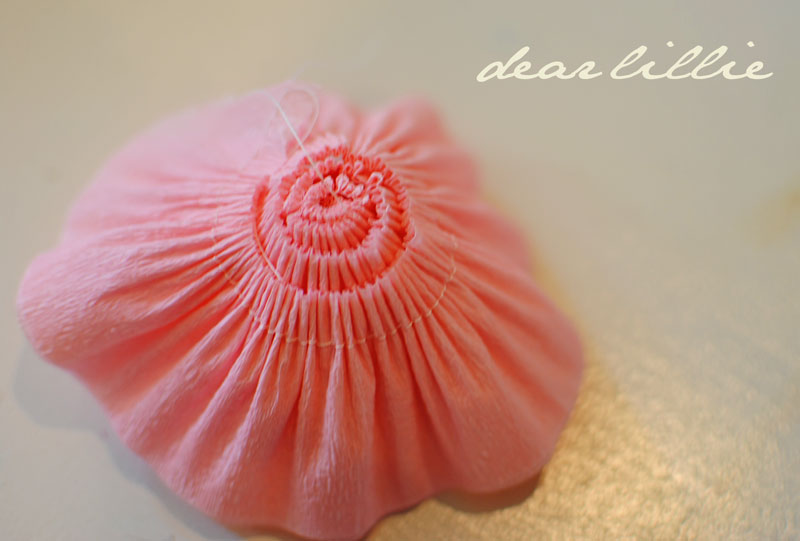
The crepe paper from Target was $1.99 a roll and I think you could probably get anywhere from 10 to 20 flowers out of each roll (depending on their size) and you can't beat 10 to 20 cents per flower. And they really were easy. However, I switched mine up a tiny bit because for some reason I had trouble making mine look like Janet's when I did the fold in half part from her tutorial. Hers were so beautiful and fluffy and mine kept coming out like this and looked so flat and tight and not nearly as pretty as hers.


I am not sure what I was doing wrong but after four turning out like the one above I gave up and tried doing mine a tiny bit different. Below is how I did mine step by step but you can also check out her tutorial and see which one works better for you. The only part that's different is where you sew your ruffle (hers is down the middle and mine is on the side) and hers are folded in half and mine aren't.
1). First cut three long strips of crepe paper.
(For my largest flower I think each strip was about 3 feet long and for the smaller ones I just made the strips a little smaller. I don't think I made any that were less than 2 feet, though).

2). Stack them on top of each other.

I figured it would be easier to make a whole bunch at once and save them for future use so I think I made around 20-25 of them and first just cut all of the strips and stacked them together is piles.

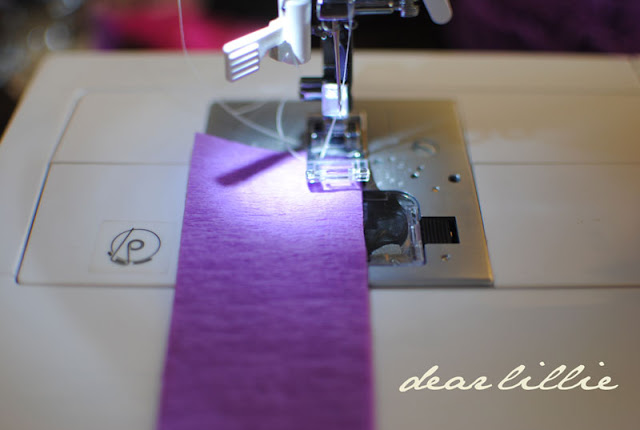
4) Set your sewing machine to make the longest stitch possible.
Here are the settings that I set my sewing machine at. You can also just hand stitch them loosely and then pull the thread at the end to make the ruffle if you don't have a machine.


5). Now start sewing!

It always helps having some Disney Princesses stickers! We sewed so many of these streamers that Lillie got a little bored with her part of "pushing the pedal" and starting decorating my machine instead.

6) When you are done sewing they should look like this.
They will kind of curl up on their own.

7) Now start at one end and start rolling.
I recommend rolling them somewhat loosely. If you do it too tight it won't look right. It took me a few tries to figure out how loosely to do it.

For smaller sized ones it's okay for them to be a little bit tighter.
But for larger ones I found it works better if they rolled more loosely, like this:

8) When you get to the end just add a dab of hot glue and glue it closed.

9) Now cover the bottom in hot glue.

10) Cover that with a strip or two of crepe paper.
After that trim that down and then cut off any loose thread.
*****PLEASE NOTE: I used white thread for all of mine so that it would show up in the photos for this tutorial but I would recommend using the same color thread as your crepe paper!

Now you should have a nice pile of flowers that look kind of like roses.

11) And now for the final step just pull apart each streamer layer
and "fluff" them and they will look like the flowers below!
If you like the look of the flowers above then, of course, just leave them like that. Personally, I prefer the fluffy peony look a bit better. Then just glue them onto your gift and there you go!


Calla - tutorial
I copied this tutorial from:
http://craftinomicon.blogspot.com/2012/01/paper-calla-lilies.html
Hey everyone! I'm super excited about this tutorial, as I have been toying with these flowers for over a week now trying to get them just right. I was actually unable to find any other tutorials online for making paper calla lilies, though I did see several lovely varieties on image searches. Hopefully I managed to do these beautiful flowers some justice :)
To start out you will need:
Paper in the color of your choosing (I used Lokta Fiber paper from Paper Source)
floral wire
scissors
pencil (for lightly tracing template onto your paper)
lily template (I suggest printing it out onto card stock for easier tracing)
Sculpey clay in a color of your choosing (or some other stamen, if you come up with a better idea please share it!)
floral tape
glue
You will want to print out the following template in your desired size. The great thing about making paper flowers is you can make flowers any size you want, large or small no matter what size they come in naturally.

Once I have decided on the size of flowers I am making, I start my whole flower making process on these by first making a bunch of stamens for my lilies. To do this I twist a length of floral wire to give myself a small stem, then I use Sculpey clay (available in most art and craft stores) to shape my stamens around one end of my wire. Calla lilies have really easy stamens, as they are just a long cylinder you roll out on a flat surface once you have inserted your wire. I generally make a short, fat cylinder, then insert my wire, then roll to desired length. From one package of Sculpey clay I can get about 8 stamens that are about 4 inches long and 1/4- 1/2" wide. Follow the baking instructions on your clay package to bake and set your clay.

Once you have your stamens made, it is time for the flower petals. Trace your template onto the paper of your choice. A thinner paper works quite nicely for these, as there is a lot of bending and these look a bit better without hard folds and creases. A crepe paper would work nicely, if you can find it in sheets as opposed to streamers. Cut out your petal, being careful to try and cut slightly inside your lines to avoid any pencil on your final flower.

Now, you will get to start shaping your petals. I use my fingers to start gently bending the paper into my desired shape, like so:

If you have a stiffer paper, you might want to use the back of a spoon and rub it over the surface of your paper to soften it a bit. I have a burnishing tool from a college printmaking class that I use for this, but you can also just rub with your fingers to make your paper fiber soften up and become a bit more mobile. Once you get your basic shape, you will want to shape the bottom of your flower into a cone and glue it in place.

I tend to make a perfect point at one end, as shown above. The insert the stamen, I will snip just a tiny bit off to make a hole that the wire can pass through.
Once your glue dries, you end up with this shape, a petal ready for some final shaping and a stamen:

To shape my petal, I again use my fingers to gently bend and fold the petal to my desired final shape:

Now, I insert the stamen, glue it into place and wrap my floral wire with floral tape. You can also add a longer stem and some leaves if you want to :)

I'd love to hear what you all think of how these turned out, I'm really excited about them!
Abonner på:
Opslag (Atom)